In this tutorial, we will show you how to fix “Upload Failed to Write File to Disk” error in WordPress.
As a WordPress user, you may have experienced the frustrating error message, “Upload failed to write file to disk” when trying to upload media files to your website.
This error can occur due to various reasons such as incorrect file permissions, lack of storage space, or corrupted upload directory.
Why does the “Upload Failed to Write File to Disk” Error Occur in WordPress?
The “Upload Failed to Write File to Disk” error message can occur due to several reasons, including:
Incorrect File Permissions: Incorrect file permissions can cause the error message to appear when you try to upload media files to your website. If your web server does not have permission to write to the uploads directory, you will get the “Upload Failed to Write File to Disk” error.
Insufficient Storage Space: If your website has used up all the available storage space, you will not be able to upload media files to your website, and you will receive the “Upload Failed to Write File to Disk” error.
Corrupted Upload Directory: A corrupted upload directory can also cause the “Upload Failed to Write File to Disk” error. The upload directory is the folder on your server where WordPress stores all your media files. If this directory becomes corrupted, you will not be able to upload any media files to your website.
Now that you know why the “Upload Failed to Write File to Disk” error occurs let’s dive into how to fix it.
How to Fix “Upload Failed to Write File to Disk” Error in WordPress
Method 1: Change File Permissions
The first method to fix the “Upload Failed to Write File to Disk” error is to change file permissions.

Follow these steps to change file permissions:
Log in to your WordPress site via FTP.
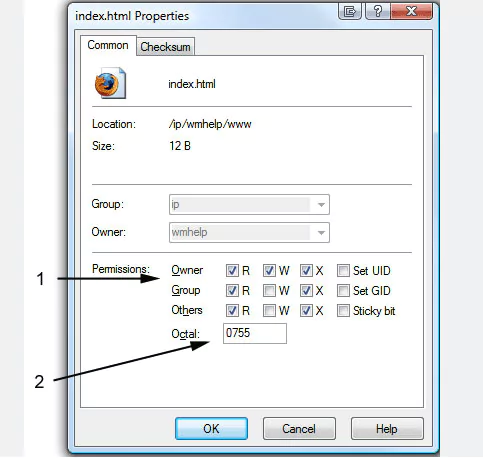
Navigate to the wp-content folder and right-click on it.
Click on the “File Permissions” option.
Change the numeric value in the “Numeric value” field to 755.
Check the “Recurse into subdirectories” checkbox.
Click on the “Apply to directories only” radio button.
Click on the “OK” button to save the changes.
Now try uploading the media file again to see if the error message disappears.
Method 2: Increase PHP Memory Limit
The second method to fix the “Upload Failed to Write File to Disk” error is to iincrease the PHP memory limit.

Follow these steps to increase the PHP memory limit:
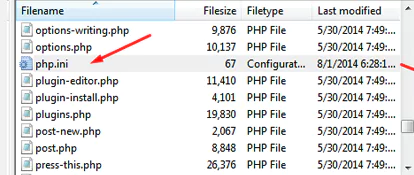
Create a blank text file and name it php.ini.
Add the following line of code to the file: memory_limit = 256M
Save the file and upload it to the /wp-admin/ folder on your server.
Try uploading the media file again to see if the error message disappears.
Method 3: Check Your Available Storage Space
The third method to fix the “Upload Failed to Write File to Disk” error is to check your available storage space.
Follow these steps to check your available storage space:
Log in to your web hosting control panel.
Navigate to the Summary section.
Check how much disk space you have used and how much is remaining.
If you have used up all the available disk space, you will need to free up some space before you can upload any media files to your website.
Method 4: Rename the Uploads Directory
The fourth method to fix the “Upload Failed to Write File to Disk” error is to rename the uploads directory.
Renaming the uploads directory is a potential solution to the “Upload Failed to Write File to Disk” error in WordPress.

Here are step-by-step instructions to guide you through this method:
- Access Your WordPress Site Files:
- Connect to your website via FTP using an FTP client like FileZilla.
- Navigate to the root directory of your WordPress installation.
- Locate the “wp-content” Directory:
- Within the root directory, find the “wp-content” folder.
- Enter the “Uploads” Directory:
- Inside “wp-content,” locate and enter the “uploads” directory.
- Rename the “Uploads” Directory:
- Right-click on the “uploads” folder.
- Choose the “Rename” option from the context menu.
- Assign a new name to the directory (e.g., change “uploads” to “uploads_old”).
- Update WordPress Settings:
- Log in to your WordPress admin dashboard.
- Go to “Settings” and select “Media.”
- Find the “Uploading Files” section.
- Change the “Store uploads in this folder” field to reflect the new directory name (e.g., “uploads_old”).
- Check File Uploads:
- Attempt to upload files through the media uploader on your WordPress site.
- Verify File Uploads and Functionality:
- After renaming the directory, check if you can successfully upload files.
- Ensure that images and other media files are displaying correctly on your site.
- Restore Original Name (if necessary):
- If the error persists or if you want to revert changes, repeat steps 1-3.
- Rename the directory back to its original name (e.g., change “uploads_old” back to “uploads”).
- Update the “Store uploads in this folder” field in WordPress settings accordingly.
- Check File Permissions:
- Confirm that the directory and its subdirectories have the correct permissions (typically 755 for directories).
By following these steps, you can resolve the “Upload Failed to Write File to Disk” error by renaming the uploads directory on your WordPress site
If you still see the error, then you will need to contact your WordPress hosting provider and ask them to empty the temporary files directory.

