In this tutorial, I’ll show you how to troubleshoot and fix “Add Media” button not working issue in WordPress. Adding media files, such as images or videos, is a common task when creating content on WordPress.
However, sometimes you may encounter an issue where the “Add Media” button doesn’t work.
This can be frustrating, especially if you’re not sure what’s causing the problem.
Common Causes of “Add Media” Button Not Working
There are several reasons why the “Add Media” button may not be working in WordPress.
Here are some of the most common causes:
Browser issues:
Sometimes the issue is caused by the browser you’re using. Clearing your browser cache and cookies may solve the problem.
Plugin conflicts:
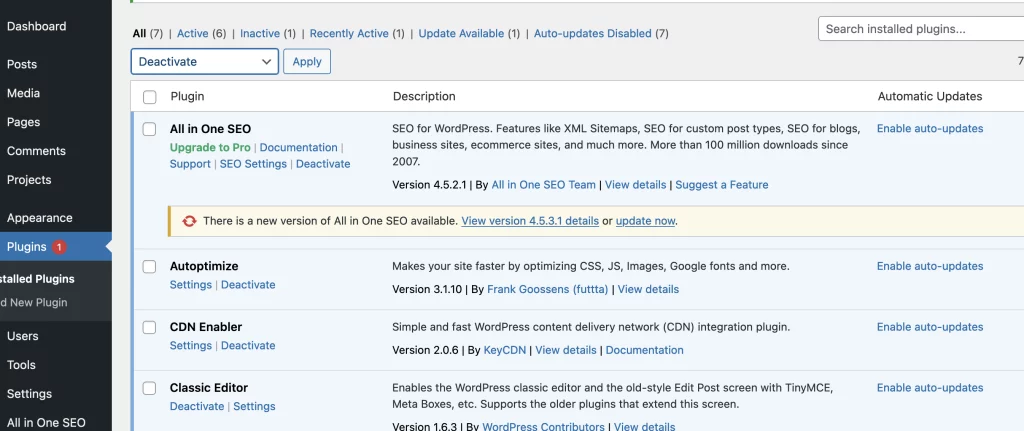
If you recently installed or updated a plugin, it may be conflicting with the “Add Media” button. Try deactivating all your plugins and then reactivating them one by one to see if the problem is resolved.
Theme issues:
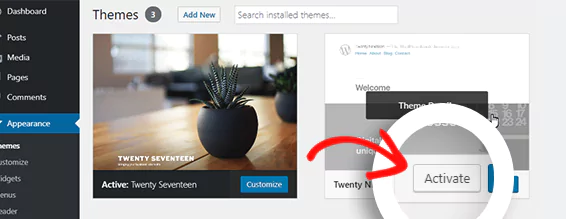
Your WordPress theme may be the culprit. Try switching to a default WordPress theme, such as Twenty Twenty-One, and see if the issue persists.
WordPress core issues:
In rare cases, the issue may be caused by a problem with the WordPress core files. Updating WordPress to the latest version may fix the problem.
Steps to Fix “Add Media” Button Not Working
Now that we’ve covered some of the common causes of the “Add Media” button not working, let’s take a look at some steps you can take to fix the issue.
Step 1: Clear Your Browser Cache and Cookies
The first thing you should try is clearing your browser cache and cookies.

This will remove any stored data that may be causing the problem.
To clear your browser cache and cookies, follow these steps:
Open your web browser and navigate to your WordPress site.
Press Ctrl+Shift+Delete on Windows or Command+Shift+Delete on Mac to open the browser’s clear data dialog.
Select the option to clear your cache and cookies.
Click on the “Clear Data” button.
Once you’ve cleared your cache and cookies, try accessing the “Add Media” button again and see if the issue is resolved.
Step 2: Deactivate Your Plugins
If clearing your browser cache and cookies doesn’t work, the next step is to deactivate your plugins.

To do this, follow these steps:
Log in to your WordPress dashboard.
Click on “Plugins” in the left-hand menu.
Select all your plugins by ticking the checkbox at the top.
From the “Bulk Actions” dropdown, select “Deactivate” and click the “Apply” button.
Once you’ve deactivated your plugins, try accessing the “Add Media” button again and see if the issue is resolved.
If the problem goes away, reactivate your plugins one by one until you find the one causing the issue.
Step 3: Switch to a Default WordPress Theme
If deactivating your plugins didn’t work, the next step is to switch to a default WordPress theme.

To do this, follow these steps:
Log in to your WordPress dashboard.
Click on “Appearance” in the left-hand menu.
Click on “Themes.”
Select a default WordPress theme, such as Twenty Twenty-One, and click on the “Activate” button.
Once you’ve switched to a default WordPress theme, try accessing the “Add Media” button again and see if the issue is resolved.
If it is, your previous theme may have been causing the problem.

