How to fix WordPress Maintenance Mode error in WordPress is relatively straightforward.

Fix the WordPress Maintenance Mode Error

Follow these steps:

Step 1: Removing the .maintenance File
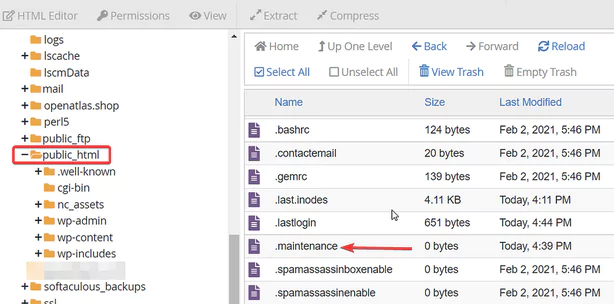
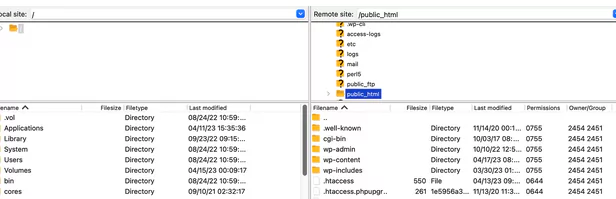
Removing the .maintenance File

  1. Access Your Website’s Files: Use an FTP client like FileZilla or your WordPress hosting file manager to connect to your website.
  2. Locate the .maintenance File: Navigate to your site’s root directory. If you don’t see the .maintenance file, ensure your FTP client is set to display hidden files.
  3. Delete the File: Once found, right-click on the .maintenance file and select ‘Delete’ to remove it from the root folder.

This action will take your website out of maintenance mode, and the error should be resolved.

Troubleshooting the WordPress Maintenance Mode Error

In some cases, further troubleshooting steps might be necessary:

WordPress Remains Stuck in Maintenance Mode Even After File Removal

Stuck in Maintenance Mode

If your website is still displaying the maintenance mode message after deleting the .maintenance file, you might need to update the wp-activate.php file in the primary WordPress folder.

Open the File: Use your hosting company’s file manager or FTP to access the file.

Modify the Code: Look for the line:

define('WP_INSTALLING', true);

Change ‘true’ to ‘false’:

define('WP_INSTALLING', false);

Save and Upload: Save the changes and upload the modified file back to your hosting server using FTP or file manager.

Site Issues Post Maintenance Mode Fix

If your website experiences issues after coming out of maintenance mode due to an interrupted update:

  • WordPress Core Update Interruption: If the error occurred during a WordPress core update, safely update WordPress following our guide.
  • Plugin Update Interruption: If it happened during a plugin update, temporarily deactivate all plugins using FTP, identify the problematic plugin by reactivating them one by one, and manually reinstall its update.

Preventing the WordPress Maintenance Mode Error

Avoid encountering this error in the future by considering these preventive measures:

  1. Upgrade Hosting: Opt for a higher-tier hosting plan with better performance if a slow server or low memory issue is the cause.
  2. Sequential Plugin/Theme Updates: Update plugins and themes one by one instead of simultaneously. Avoid rapid clicking on the ‘Update’ button to reduce the chance of a conflict.
  1. Regular Backups: Perform regular backups of your WordPress website using reliable backup plugins. This way, if an update interruption occurs, you can restore your site to a previous working state.
  2. Scheduled Updates During Low Traffic Hours: Plan updates during off-peak hours when your website experiences less traffic. This minimizes the chance of a conflict due to high server load.

Customizing the Maintenance Mode Notification

By default, WordPress displays a standard maintenance mode message. You can customize this notification to provide visitors with more information or branding elements. Here’s how:

  1. Using a Plugin: Install and activate a maintenance mode plugin like “SeedProd” or “Coming Soon Page & Maintenance Mode.” These plugins offer customizable maintenance mode pages with various templates and customization options.
  2. Manually Editing the .maintenance File: For more advanced users comfortable with coding, you can edit the .maintenance file directly in your root directory. Use HTML and CSS to modify the default message and style it to match your website’s branding.

Here’s an example of a customized maintenance mode message in HTML format:

<!DOCTYPE html>
<html lang="en">
<head>
<meta charset="UTF-8">
<title>Site Maintenance</title>
<style>
/* Customize the message and style */
body {
font-family: Arial, sans-serif;
background-color: #f5f5f5;
text-align: center;
padding-top: 100px;
}
h1 {
color: #333;
font-size: 36px;
margin-bottom: 20px;
}
p {
color: #666;
font-size: 18px;
margin-bottom: 40px;
}
/* Add your custom branding styles */
.logo {
max-width: 200px;
margin-bottom: 20px;
}
.custom-link {
color: #0073e6;
text-decoration: none;
}
</style>
</head>
<body>
<img src="your-logo.png" alt="Your Site Logo" class="logo">
<h1>Site Under Maintenance</h1>
<p>We're working hard to improve your experience.<br>Check back soon!</p>
<p><a href="#" class="custom-link">Contact us</a> for urgent matters.</p>
</body>
</html>

Replace “your-logo.png” with your actual logo image and adjust styles and content as needed.

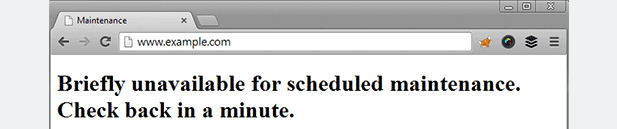
We hope this article helped you fix the ‘Briefly unavailable for scheduled maintenance’ error in WordPress. You may also want to read our guides on fixing the most common WordPress errors.